How to Put Seat Cover on Car: Easy Step-by-Step Guide

Putting a seat cover on your car may seem simple, but it’s easy to make mistakes if you don’t know the right steps. A seat cover does more than just protect your seat from dirt and wear—it can also change the look of your car interior and increase comfort.
Many people buy seat covers to keep their original seats in good condition, especially if they plan to sell their car in the future. But how do you make sure the seat cover fits well, looks good, and doesn’t slip every time you get in?
This guide walks you through every detail you need to know.
Why Use Seat Covers?
A car’s seats are one of the first parts to show wear and tear. Seat covers act as a shield against spills, stains, and sunlight. They also help if you travel with kids or pets, or if you eat in your car. Some covers even offer extra comfort with padding or special materials.
Another benefit is style. With many colors, designs, and materials, seat covers can make your car feel new again. According to a 2023 survey by Statista, about 38% of car owners in the US use seat covers mainly for protection, while 24% use them to improve appearance.
Choosing The Right Seat Cover
Before you start, it’s important to pick the right seat cover for your car and your needs. Here are the main factors to consider:
1. Size And Fit
Seat covers come in universal and custom-fit options. Universal covers fit most cars but may not match the shape perfectly. Custom-fit covers are made for your car’s model and year, giving a snug look.
2. Material
Common materials include:
- Fabric: Breathable and comfortable, but can absorb spills.
- Leather/Leatherette: Looks premium and is easy to clean, but can be hot in summer.
- Neoprene: Water-resistant and durable, good for outdoor activities.
- Velour: Soft and plush, but not as easy to clean.
3. Features
Some covers have extra features like:
- Heated pads
- Extra pockets
- Anti-slip backing
4. Color And Design
Choose a color or pattern that matches your car’s interior. Dark colors hide dirt better, while lighter shades can make the inside look bigger.
| Material | Comfort | Protection | Ease of Cleaning |
|---|---|---|---|
| Fabric | High | Moderate | Medium |
| Leatherette | Medium | High | Easy |
| Neoprene | Medium | Very High | Easy |
| Velour | High | Low | Difficult |
Pro tip: Always check if the seat cover allows for side airbags to function. Some covers can block the airbags, which is unsafe.

Credit: www.familyhandyman.com
Tools And Preparation
You don’t need many tools, but having the following nearby helps:
- A clean, dry cloth or vacuum
- Scissors (sometimes, for adjusting straps or holes)
- Small flat tool (like a butter knife, to tuck in fabric)
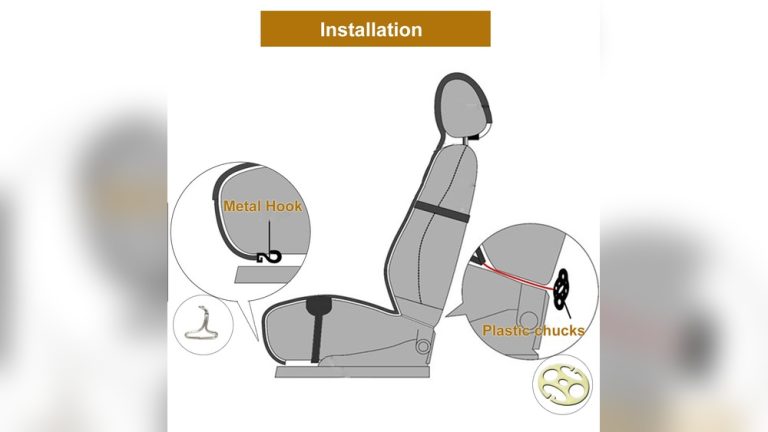
- Your seat cover kit with hooks, straps, and instructions
Beginner insight: Don’t skip cleaning your seats before installing covers. Dirt or crumbs under the cover can scratch your seats over time and make the cover slip.
Step-by-step Guide: How To Put Seat Cover On Car
Let’s break down the process so you get a smooth, wrinkle-free finish.
Step 1: Remove The Headrest And Move The Seat
Start by sliding the seat back as far as possible. If your car has adjustable headrests, pull them out. Most covers need you to thread them through the headrest holes.
Non-obvious tip: Take a picture of your seat before you start. This helps if you need to remember where everything goes, especially if you’re removing armrests.
Step 2: Clean The Seat
Use a vacuum or a cloth to remove dust, dirt, or pet hair. If you put a cover on a dirty seat, you may trap moisture or smells underneath.
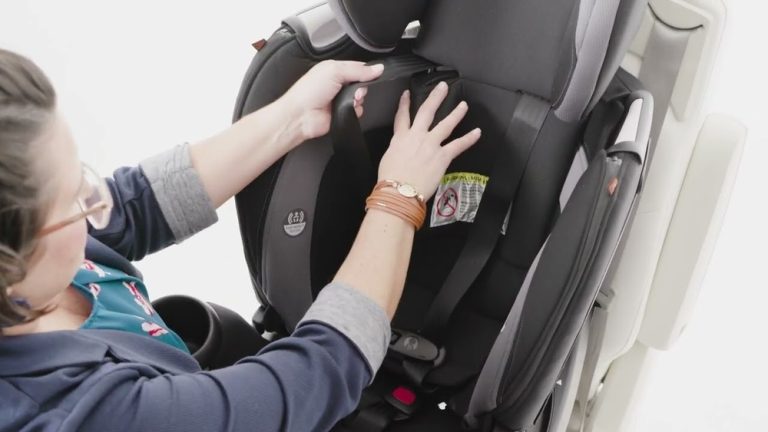
Step 3: Fit The Seat Cover Over The Backrest
Pull the cover over the top of the seatback. Align any holes for the headrest posts. Smooth out the fabric as you pull it down.
- If your cover has a zipper or Velcro, fasten it at the back to keep it tight.
- For bucket seats, make sure the cover fits snugly around the curves.
Step 4: Attach The Cover Under The Seat
Most covers have straps or hooks that go under the seat. Reach under, pull the straps tight, and connect them to the loops or hooks on the other side. This step prevents the cover from sliding.
Beginner mistake: Many people forget to pull the straps tight. If you leave them loose, the cover will bunch up and move every time you get in or out.
Step 5: Replace The Headrest
Cut small holes in the fabric if the cover does not have pre-made openings for headrest posts. Put the headrest back in place. Some covers have separate pieces for the headrest—slide these on before reattaching.
Step 6: Tuck In The Sides And Adjust
Use your hands or a flat tool to tuck extra fabric into the creases between the seat and backrest. This step helps the cover look smooth and stay in place.
Step 7: Repeat For The Bottom Cushion
If your cover comes in two pieces (backrest and bottom), repeat the process for the seat cushion. Stretch the cover over the cushion, pull the straps under, and hook them tightly.
Step 8: Secure And Test
Double-check all straps and hooks. Sit in the seat and move around to make sure the cover doesn’t shift. Adjust as needed.
Step 9: Install Rear Seat Covers (if Needed)
The back seats are often trickier because they don’t move as much. Fold down the seat if possible. Install the cover as you did with the front seats, making sure to align any seat belt holes.
Extra insight: Some rear seat covers come in three pieces (backrest, seat, and armrest). Install each part separately for a better fit.
Tips For Tricky Seats
Certain cars have special seats that need extra care:
- Split-fold seats: Make sure you can still fold the seats after installing the cover.
- Seats with built-in airbags: Only use covers marked as “airbag-safe.”
- Seats with armrests or levers: Some covers have zippered or Velcro openings for these parts. Don’t force the cover over—open the zipper or cut a small hole if needed.
| Seat Type | Special Consideration | Best Cover Type |
|---|---|---|
| Buckets with airbags | Airbag safety | Airbag-compatible |
| Split-fold rear | Maintaining fold function | Separate-piece cover |
| Seats with armrest | Access to armrest | Zipper opening cover |
Common Mistakes To Avoid
Even careful people make these errors:
- Skipping the cleaning step: This leads to dirt rubbing against the seat, causing wear.
- Not tightening straps: Loose covers look messy and move around.
- Ignoring airbag compatibility: This can be dangerous in an accident.
- Cutting large holes for headrests: Cut only as much as needed; big holes can tear.
- Using harsh cleaners before install: Some cleaners leave residue that makes covers slip.
Care And Maintenance
A seat cover can last years if you care for it properly.
- Vacuum regularly: Remove crumbs and dirt from the surface.
- Spot clean stains: Use mild soap and water for small spots. Test on a hidden area first.
- Remove for deep cleaning: Some covers are machine-washable. Follow the care label—hot water can shrink or damage some materials.
- Avoid harsh chemicals: Bleach or strong detergents can fade color and weaken fabric.
Hidden benefit: Well-maintained covers make it easier to sell your car later, since the original seats are still in good condition underneath.
When To Replace A Seat Cover
Seat covers don’t last forever. Replace if you see:
- Tears or holes
- Faded color that cannot be cleaned
- Stretched-out fabric that won’t stay tight
- Odors that won’t go away even after washing
Some high-quality covers can last up to 5 years with good care, but cheaper ones may need replacing sooner.
Real-world Example: Quick Seat Cover Upgrade
Anna, a rideshare driver, wanted to protect her car’s seats from spills and dirt. She chose neoprene covers for water resistance and easy cleaning. Following the steps above, she finished both front seats in under 30 minutes. After a week, she noticed less worry about coffee spills and her car stayed cleaner. The only adjustment needed was tightening one strap that had worked loose.
Insight: If you drive for work or have kids, investing time in proper installation pays off in daily comfort and less cleaning hassle.
Quick Comparison: Universal Vs. Custom Seat Covers
Here’s a simple view to help you choose.
| Type | Fit | Cost | Looks | Installation |
|---|---|---|---|---|
| Universal | Loose | Low | Basic | Easy |
| Custom | Snug | High | Matches interior | Moderate |
Where To Get Reliable Seat Covers
You can buy seat covers online, at auto parts stores, or even some big supermarkets. Look for brands with good reviews and clear return policies. Always check if the cover is compatible with your car’s make and model.
For more advice on car accessories, you can read reliable guides on Consumer Reports.
Frequently Asked Questions
How Long Does It Take To Put On A Seat Cover?
Most people can install a basic cover in 15-30 minutes per seat. Rear seats or custom-fit covers may take longer.
Do Seat Covers Affect Seat Airbags?
Yes, they can. Always use airbag-compatible covers if your car has seat airbags. Never block the airbag area with a cover that is not designed for it.
Can I Wash Seat Covers In A Washing Machine?
Many fabric covers are machine-washable, but check the label first. Leatherette and neoprene covers usually need hand cleaning.
Will Seat Covers Fit All Cars?
Universal covers fit most seats, but may not look perfect. For the best fit, choose custom covers made for your car’s model and year.
What If The Cover Slides Or Bunches Up?
This usually means the straps are too loose, or the cover is too big. Tighten all straps, and tuck in extra fabric. If the cover still moves, consider a different size or style.
Putting a seat cover on your car is a small job with big benefits. You protect your seats, improve comfort, and even add style. By following these steps and avoiding common mistakes, you’ll get a smooth fit that lasts. Even if you’re new to car care, you can do this with a little patience and attention to detail.