How to Attach Car Seat Covers Under the Seats: Step-by-Step Guide
Fitting car seat covers under your seats may seem like a simple task, but it often turns into a puzzle for many car owners. Why? Because every car is a little different, seat cover styles vary, and the job requires a mix of patience and technique.
If you want your car’s interior to look clean, professional, and protected, learning how to attach seat covers properly—especially under the seats—is essential. This guide will walk you through every step, from preparation to final adjustments, and address common problems people face.
Why Proper Seat Cover Installation Matters
Car seat covers do more than just refresh your car’s appearance. They help protect the original upholstery from spills, dirt, and wear. Well-fitted covers can even boost your car’s resale value by keeping the seats in good condition. However, poorly installed covers often shift, bunch up, or even block seat controls. Attaching them securely under the seats is key for both safety and comfort.
Understanding Different Types Of Car Seat Covers
Before you start, you need to know what type of seat cover you have. Each style uses a unique attachment method under the seat.
| Cover Type | Main Attachment Method | Installation Difficulty |
|---|---|---|
| Universal Fit | Elastic straps, hooks | Easy-Moderate |
| Custom Fit | Velcro, buckles, hooks | Moderate |
| Semi-Custom | Elastic straps, hooks | Moderate |
| Leather/Heavy-Duty | Clips, heavy straps | Challenging |
Universal fit covers are the most common and easiest for beginners, while custom-fit options may require more time but deliver a seamless look.

Credit: www.calcarcover.com
Tools And Supplies You’ll Need
Gather these items before starting for a smooth installation:
- Seat covers (make sure you have the right size and style)
- Installation kit (often included; may contain hooks, straps, clips)
- Flathead screwdriver or plastic trim tool (helps tuck covers)
- Flashlight (for seeing under seats)
- Scissors (for trimming long straps if needed)
- Work gloves (optional for tight spaces)
- Owner’s manual (some cars have hidden seat controls or airbags)
A common mistake is to skip checking your installation kit. Always confirm you have all the parts before you begin.
Preparing Your Car And Seat Covers
Preparation is often overlooked but makes a big difference.
- Clean the seats: Remove dust, crumbs, and stains. Covers stick better to clean fabric.
- Remove headrests: Most covers fit easier when the headrests are out.
- Slide front seats back: This opens up more space to work under the seats.
- Check for airbags: Some newer cars have side airbags in the seat. Use covers marked “airbag compatible” for safety.
- Inspect the seat covers: Make sure there are no missing straps or defective clips.
- Lay out all supplies: This saves you from hunting for tools mid-job.
Many beginners miss the step of checking for seat airbags, which can be a serious safety issue.
Credit: www.cover-company.com
Step-by-step Guide: Attaching Car Seat Covers Under The Seats
Here’s how to do the job right, even if you have never tried it before.
1. Positioning The Cover
- Drape the cover over the seat, aligning the seams with the seat’s edges.
- Ensure all openings match the seatbelt, headrest, and lever locations.
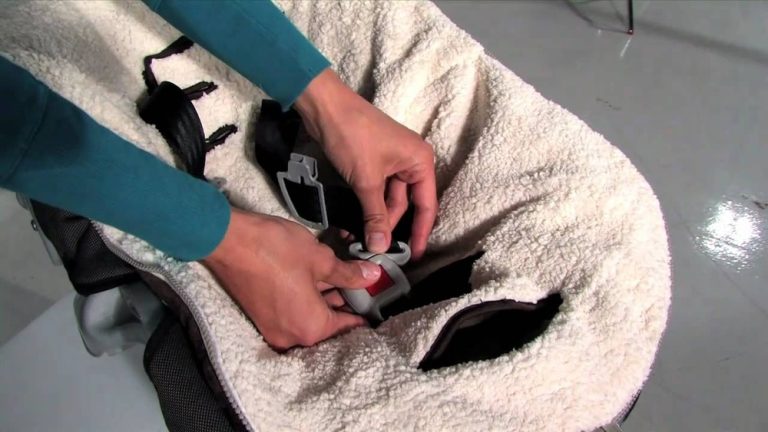
2. Tucking The Cover
- Push the seat cover material through the gap between the seat back and the seat bottom.
- Use a flathead screwdriver or plastic trim tool to help guide the fabric without tearing it.
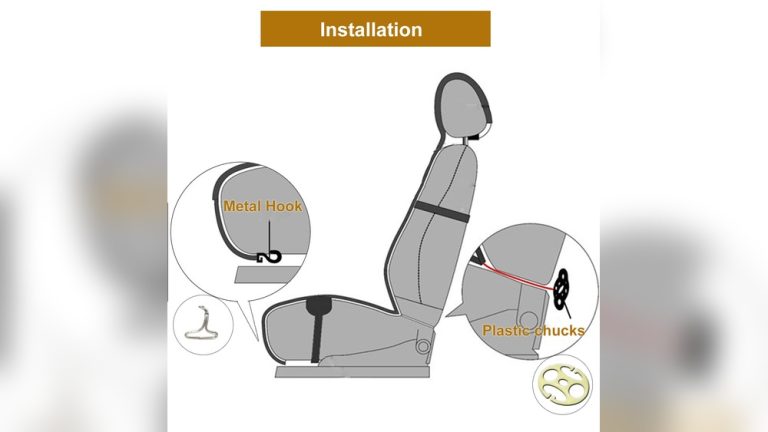
3. Securing Straps And Hooks
Most covers include straps or hooks that run under the seat.
- Locate the straps at the front and rear of the cover.
- Feed the straps under the seat. A flashlight helps you see the path.
- Avoid running straps over sharp metal edges—they can fray or break over time.
- Attach hooks to the seat springs or anchor points under the seat.
- Pull the straps tight, but not so much that they damage the seat or the cover.
Non-obvious tip: If your seat has power controls or wiring, gently route straps around them to avoid pinching wires.
4. Adjusting For A Snug Fit
- Sit in the seat and check for shifting or loose areas.
- Tighten the straps a little more if needed.
- Smooth out wrinkles and tuck in extra material along the sides and back.
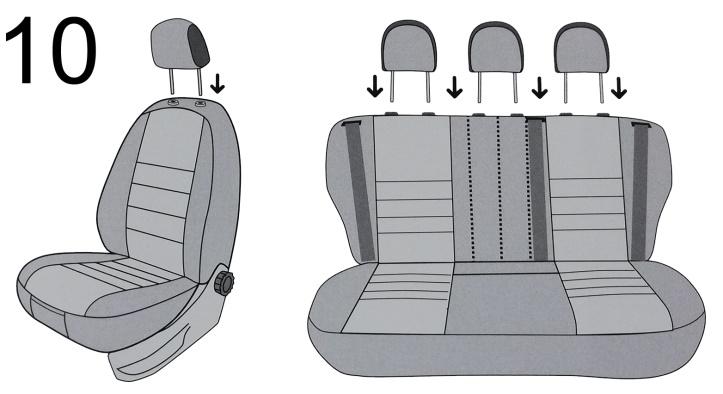
5. Reinstalling Headrests And Making Final Checks
- Cut small holes (if needed) for headrest posts using scissors.
- Reinstall headrests and test all seat controls—adjustment levers, folding, and airbags.
- Double-check that straps and hooks are secure and not interfering with seat mechanisms.
6. Repeat For All Seats
Most people start with the driver’s seat, but it’s smart to do the passenger seat next. Rear seats may require folding down or removing the bench, depending on your car.
Special Cases And Advanced Tips
Some cars or covers present extra challenges. Here’s how to handle them.
Power Seats And Wiring
If your car has electric seat controls, take extra care when routing straps. Never force straps past electrical connectors. If unsure, check your car’s owner manual or look for a wiring diagram online.
Airbag-compatible Covers
Only use airbag-compatible covers on seats with built-in airbags. Look for a label or slit on the cover’s side seam.
Bench Seats Or Split Backs
Some rear seats are split or bench-style. You may need to fold the seat or remove it completely to attach hooks or straps under the seat. Check for bolts or release levers at the base.
Trucks And Suvs
Larger vehicles may have seats mounted higher, making access easier. However, larger seats often require longer straps or extra hooks. Make sure your cover kit fits your vehicle’s size.
Common Mistakes And How To Avoid Them
Many beginners run into the same errors when fitting covers under their seats. Watch out for these:
- Skipping cleaning: Covers can trap dirt, causing wear or odors.
- Not tightening enough: Loose straps lead to shifting and discomfort.
- Pinching wires: This can cause seat controls to fail or even create a fire risk.
- Blocking seat controls: Always check all adjustments after installing.
- Using the wrong cover type: Universal covers may not fit well on unusual seat shapes or large trucks.
- Forgetting about airbags: Only use covers that are marked as safe for airbag-equipped seats.
How Long Should It Take?
For most cars, installing front seat covers takes about 20–40 minutes per seat. Rear seats may take longer, especially if they need to be removed or folded down.
Table: Time Required For Different Seat Types
| Seat Type | Estimated Time per Seat | Difficulty Level |
|---|---|---|
| Front bucket seat | 20–40 minutes | Easy-Moderate |
| Rear bench seat | 30–60 minutes | Moderate |
| Split-fold rear seat | 40–70 minutes | Challenging |
Maintenance After Installation
Keeping your seat covers in good shape means checking the straps and hooks every few months. Over time, straps can loosen or hooks can bend. A quick check and adjustment can add years to your covers’ life.
- Vacuum covers regularly to remove dust and crumbs.
- Wipe with a damp cloth to clean fabric or leather surfaces.
- Retighten straps if you notice any slipping.
- Replace broken hooks with new ones from an auto parts store.
When To Replace Or Reinstall Covers
Sometimes, even with good care, seat covers need to be removed or replaced. If straps break, covers become too loose, or they start to tear, it’s best to reinstall or upgrade. Cheap universal covers may only last a year or two, while high-quality custom covers can last much longer if properly maintained.
Table: Seat Cover Lifespan By Material
| Material | Average Lifespan | Maintenance Level |
|---|---|---|
| Fabric | 2-3 years | Low |
| Leatherette | 3-5 years | Medium |
| Real leather | 5-7 years | High |
| Neoprene | 4-6 years | Medium |

Credit: www.reddit.com
Practical Examples
To make this process clearer, consider these examples:
- Compact sedan: Most universal covers fit well. The main challenge is working around tight spaces under the front seats.
- Pickup truck: Larger seats need longer straps. Back seats may have hidden anchors.
- SUV with split rear seats: Covers must allow for folding. Look for split-compatible designs.
If you get stuck, many car accessory shops can help with installation for a small fee.
Where To Find Reliable Information
For more details or troubleshooting guides, the owner’s manual is your best resource. Car forums and official car maker websites also offer model-specific tips. For general advice and installation videos, you can visit WikiHow, which has step-by-step visual guides.
Final Thoughts
Attaching car seat covers under the seats is a task that rewards patience and careful work. Take your time, follow the steps, and don’t hesitate to double-check your work. A well-fitted seat cover not only protects your investment but also makes every drive a bit more comfortable and stylish.
With the right tools and a little know-how, you can give your car’s interior a fresh look that lasts.
Frequently Asked Questions
How Do I Know If My Seat Covers Are Airbag Compatible?
Check for a label or tag on the seat cover packaging. It should say “side airbag compatible” or show an icon. Some covers have special seams or slits to allow airbags to deploy safely.
Can I Install Seat Covers Without Removing The Seats?
Yes, most covers can be installed without removing the seats. Sliding the seat back or forward usually gives enough space to attach straps and hooks under the seat.
What If The Straps Under My Seat Are Too Short?
You can buy extension straps or additional hooks from auto parts stores. Avoid stretching the straps too much, as this could cause them to snap or damage the cover.
Will Seat Covers Affect Heated Seats?
Most fabric and neoprene covers do not block heat, but thick leather or padded covers might reduce warmth. Always check the manufacturer’s instructions before installing on heated seats.
How Often Should I Check The Straps And Hooks?
It’s best to check straps and hooks every few months, or after deep cleaning your car. This keeps the covers tight and prevents shifting or wear.
By following these steps and tips, you’ll achieve a secure, comfortable fit for your car seat covers—and enjoy a fresher, cleaner ride every day.