How to Put Car Seat Cover on: Easy Steps for a Perfect Fit

Getting a car seat cover onto your seats might sound simple, but there’s more to it than just slipping on some fabric. The right seat cover can keep your car looking fresh, protect against spills, and even make long trips more comfortable.
However, putting it on the wrong way can cause wrinkles, make it slip off, or even block important features like seat airbags. Many people rush through the process and end up frustrated. If you want your new seat covers to fit well and last long, taking the time to do it correctly is key.
Why Car Seat Covers Matter
Car seat covers serve more than just cosmetic purposes. They protect your seats from wear and tear, spills, pet hair, and UV rays. If you have kids, pets, or a busy lifestyle, a good seat cover can save you from expensive cleaning or repairs. Some covers even add extra comfort or a touch of personal style.
Certain seat covers are made for specific cars, while others are universal. Fitting a universal cover can be tricky, but with the right approach, you can get a snug and safe fit. Understanding the type of cover you have is the first step.
Types Of Car Seat Covers
There are several types of car seat covers, and knowing the difference helps you choose and install the right one:
| Type | Material | Best For |
|---|---|---|
| Universal | Polyester, neoprene, faux leather | General use, low cost |
| Custom-fit | Leather, canvas, tailored fabric | Specific car models, premium look |
| Bucket seat | Stretch fabric, mesh | Front seats, sporty cars |
| Bench seat | Heavy-duty fabric | Rear seats, trucks, vans |
Custom-fit covers are easier to install, but universal covers need more work for a good fit. Materials also affect comfort and cleaning. For example, leather covers look great but can get hot in summer, while neoprene is waterproof and good for active families.
What To Do Before You Start
Preparation is the first step people often skip, but it saves time and hassle later. Here’s what you should do before installing your seat covers:
- Check the packaging: Make sure you have all the pieces. Some sets include headrest covers, armrest covers, and hooks.
- Read the instructions: Even if you have installed covers before, read the manual. Each brand can be different.
- Clean your seats: Dirt or crumbs under the cover can cause bumps and wear. Vacuum and wipe your seats before you begin.
- Identify seat features: Look for airbag labels, levers, or seat belt openings. If your seat has side airbags, you need a compatible cover.
A missed step here can lead to mistakes that are hard to fix once the cover is on.
Step-by-step Guide: How To Put Car Seat Cover On
1. Remove Headrests (if Possible)
Most seat covers fit better if you take off the headrests. Look for a small button or latch at the base of each headrest post. Press it and pull the headrest up and out. Some cars have fixed headrests—if so, skip this step.
2. Align The Cover With The Seat
Find the front and back of your seat cover. The tag or label usually goes at the back. Slide the cover over the top of the seat, pulling it down as far as you can. Make sure the seams line up with the seat edges.
If your seat has armrests, remove or lift them as the instructions show.
3. Pull The Cover Down Firmly
Work the cover down over the seat back and the seat bottom. Tuck any extra fabric into the gap between the seat back and bottom. This step is important for a snug fit and to avoid wrinkles.
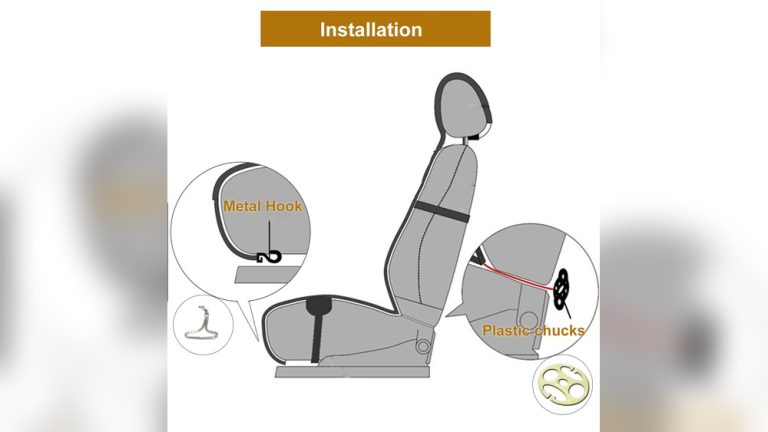
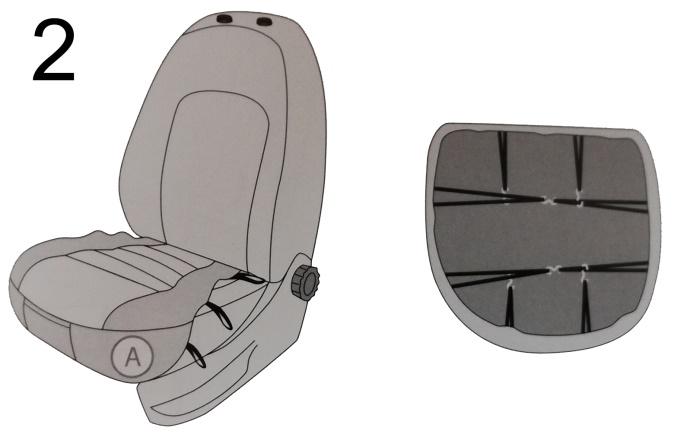
4. Secure The Cover Under The Seat
Many covers use hooks, straps, or elastic loops to stay in place. Reach under the seat and connect these hooks to the springs or bars beneath the seat. If you can’t reach, move the seat forward or backward for more space.
Here’s a quick comparison of common securing methods:
| Securing Method | Pros | Cons |
|---|---|---|
| Hooks | Very secure, less movement | Can be tricky to attach |
| Elastic straps | Quick to install, flexible | May stretch out over time |
| Velcro | Easy adjustment | May not stick well to all surfaces |
If your cover includes foam tubes, push them into the seat gaps to keep the cover from sliding.
5. Reinstall The Headrests And Cover Them
If you took off the headrests, poke holes through the cover (if needed) for the posts. Use scissors carefully if the cover doesn’t have holes already. Slide the headrests back in and attach the headrest covers.
6. Adjust And Smooth Out The Cover
Stand back and check your work. Smooth out any wrinkles or bunching. Adjust the seams and straps until the cover looks even and neat. If it doesn’t fit right, take your time to fix it now—this step is easier to do before you sit on it.
7. Repeat For Rear Seats
Rear seats are usually bench style. Some covers are one-piece, others are split for folding seats. Remove the rear headrests if possible. Align the cover, pull it over, and secure it as you did with the front seats.
If your seats fold down, make sure the cover doesn’t block the latch or folding mechanism.

Credit: www.familyhandyman.com
Practical Tips For A Perfect Fit
Some tricks make the job easier, especially for beginners:
- Use a plastic card (like an old credit card) to tuck fabric into tight gaps.
- Warm up the covers in the sun for a few minutes. Soft fabric is easier to stretch and fit.
- Check airbag compatibility. Seat covers that block side airbags are unsafe. Look for “airbag safe” tags or slits.
- Don’t cut openings for seat belts or levers unless instructions say so. Cutting can weaken the fabric.
- Work slowly. Rushing often leads to crooked seams and loose covers.
Many people forget to check under the seat for old wrappers or coins before installing covers. These can cause noise or damage the new cover over time.
Common Mistakes And How To Avoid Them
Even careful people make mistakes when putting on car seat covers. Here are some to watch out for:
- Skipping the cleaning step: Dirt left under the cover can scratch your seats or cause bad smells.
- Wrong orientation: Installing the cover backwards is more common than you think. Always double-check the label or shape.
- Forcing the fit: If the cover is too tight, don’t pull hard. Double-check if you have the right model.
- Not securing straps: Loose covers slide around and wear out faster. Use all provided hooks and straps.
- Blocking seat functions: Covers that block seat controls, folding mechanisms, or airbags can be dangerous.
If you make a mistake, it’s better to remove the cover and start again than to live with a bad fit.
Credit: www.cover-company.com
Caring For Your Car Seat Covers
Once your covers are on, keeping them clean and in good shape will help them last. Here’s how:
- Vacuum weekly to remove crumbs and dust.
- Wipe spills right away with a damp cloth.
- Check the care label before washing. Most fabric covers can be machine washed, but leather or neoprene may need special care.
- Avoid harsh cleaners that can damage the material.
- Air dry covers after washing to prevent shrinking.
Some covers trap more heat or sweat than others. If you live in a hot area, consider covers with breathable mesh or light colors.
When To Replace Car Seat Covers
Even the best seat covers wear out. Signs you need new ones include:
- Tears or holes that show the seat underneath.
- Loose fit that won’t tighten anymore.
- Persistent odors that don’t go away with cleaning.
- Fading or cracking on leather or vinyl covers.
A new cover not only looks better but also keeps protecting your original seat. Regular checks can help you catch problems before they get worse.
Real-world Example: Installing On A Family Car
Let’s say you have a Toyota Corolla with universal fabric seat covers. You follow all the steps—removing headrests, cleaning seats, checking for airbags, and securing straps. After installation, you notice the cover bunches up at the seat bottom. You use a plastic card to tuck in the fabric and adjust the straps tighter. The cover now fits smoothly, the airbag tag is visible, and all seat controls work.
A common beginner mistake is ignoring the seat belt buckles. You double-check, make small cuts as the instructions say, and avoid damaging the seams. As a result, your seat covers stay in place and keep your car looking new for months.
Quick Comparison: Universal Vs. Custom-fit Covers
To help you choose, here’s a summary:
| Feature | Universal | Custom-Fit |
|---|---|---|
| Installation Time | 20–45 minutes | 10–20 minutes |
| Fit Quality | May need adjustment | Perfect fit |
| Cost | Lower | Higher |
| Compatibility | Most cars | Specific models |
Universal covers save money but may not fit as well. Custom-fit covers cost more but are easier to install and look better.
Where To Find More Information
If you need detailed instructions for your car model, check your owner’s manual or the seat cover brand’s website. For best practices and safety tips, the National Highway Traffic Safety Administration is a reliable resource.
Frequently Asked Questions
How Long Does It Take To Put On A Car Seat Cover?
It usually takes 15 to 45 minutes per seat, depending on the cover type and your experience. Custom-fit covers are faster, while universal covers may need more adjustment.
Can I Wash My Car Seat Covers In The Washing Machine?
Most fabric seat covers are machine washable. Check the care label for instructions. Leather and neoprene covers often need hand washing or special cleaners.
Are Seat Covers Safe With Side Airbags?
Yes, if they are airbag compatible. Look for covers labeled “airbag safe” or with special side seams that break open if the airbag deploys.
What If My Car Has Heated Seats?
Most modern seat covers work with heated seats, but thick or insulated covers may slow the heating. Always check the product description before buying.
Do Seat Covers Work For All Vehicles?
Universal covers fit most cars, trucks, and SUVs, but not all. If your seats have unusual shapes or features, check for custom-fit options for the best results.
Putting on a car seat cover is more than just a quick DIY task. With the right steps and a little patience, you can protect your seats, improve comfort, and keep your car looking great for years to come.