How to Put Car Seat Cover Back On: Easy Step-by-Step Guide
Putting a car seat cover back on can feel like a small job, but it often turns into a frustrating puzzle. Many people struggle with bunched fabric, loose straps, or covers that just will not fit right. If you have ever tried to do it quickly, you know the results can look messy and feel uncomfortable.
But with patience, the right steps, and a few smart tips, you can make your car seats look almost new again. This guide walks you through each part of the process, from getting your tools ready to finishing touches, with advice for both beginners and those who have done it before.
Understanding Your Car Seat Cover
Before you start, it helps to know what type of car seat cover you have. There are many different styles, and each one has its own way of fitting.
- Universal covers: These are designed to fit many cars. They usually use elastic bands and hooks.
- Custom-fit covers: Made for your specific car model, these fit snugly and often have special openings for seat belts and headrests.
- Slip-on covers: Simple to install, but can move around more.
- Full wrap covers: Cover the entire seat, including the back. Installation can take longer.
Check your cover’s label or manual if you have it. Some covers have extra padding or waterproof layers. Knowing the type helps you plan your steps and avoid mistakes like tearing the fabric or blocking safety features.
Tools And Preparation
Getting ready makes the job much smoother. Here’s what you need:
- Clean car seat: Wipe the seat before putting the cover on. Dust and crumbs make the cover sit unevenly.
- Flathead screwdriver: Helps tuck fabric into small spaces.
- Plastic trim tool: Protects your car’s plastic parts while tucking.
- Scissors: Cut off loose threads or adjust elastic (if needed).
- Flashlight: Helps see under and behind seats.
- Owner’s manual: Shows how to remove or adjust headrests.
Lay out the seat cover parts and read any instructions. If your cover has pieces for armrests or headrests, separate them. This avoids confusion during installation.
Removing The Old Car Seat Cover
If you took the cover off to clean it, remember how you removed it. If not, here’s a quick guide:
- Remove the headrest if your car allows. Most headrests pull out with a button or latch.
- Undo hooks, straps, or Velcro under the seat. Keep these parts in a safe spot so you do not lose them.
- Slide the cover off slowly to avoid stretching or ripping.
Take a photo of the seat before removal. This will help when you put the cover back on, especially if your cover has a unique fit.
Step-by-step: How To Put Car Seat Cover Back On
Putting the cover back on needs patience. Here is how to do it right.
1. Position The Cover Correctly
Lay the seat cover over the seat to check its orientation. The wider part usually goes at the bottom, with holes or openings for headrests at the top. Make sure any special features line up, like side airbags or seat belt slots.
2. Secure The Bottom Part
Start with the seat cushion:
- Pull the cover over the seat’s bottom.
- Tuck the sides and front under the seat. Use your hands or a plastic trim tool.
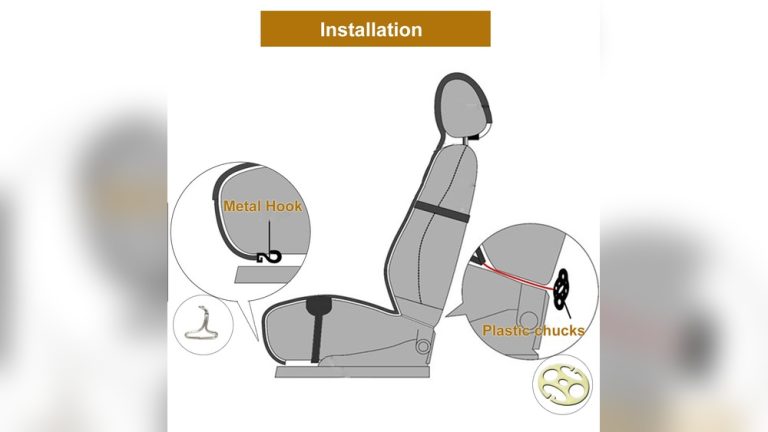
- If your cover has straps, push them between the seat back and bottom. Pull them tight under the seat, then fasten with hooks or buckles.
Non-obvious insight: If the cover is too tight, adjust the seat’s position forward or backward. This gives you more room to pull the cover and attach straps.
3. Fit The Backrest
Now cover the seat’s back:
- Slide the cover over the top of the seat back.
- Pull it down evenly, smoothing out wrinkles as you go.
- Tuck the sides into the gap between the seat back and bottom. Use a screwdriver (carefully) or trim tool for deep crevices.
- Fasten any straps, Velcro, or hooks behind the seat.
Some covers have zippers or buttons on the sides. Make sure they are closed so the cover stays tight.
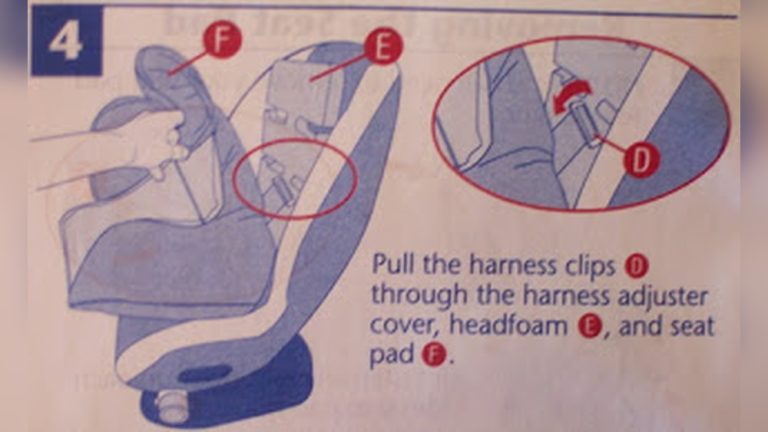
4. Reinstall The Headrest
- Find the holes or flaps for the headrest.
- Cut small slits if the cover does not have pre-made holes (only if the instructions allow).
- Push the headrest posts through the fabric.
- Reinstall the headrest into the seat.
Practical tip: Use a flashlight to check the holes line up perfectly. Forcing the headrest can rip the cover.
5. Secure Extra Attachments
If your cover has extra pieces (armrests, lumbar support, side covers):
- Attach these last.
- Follow the cover’s specific instructions—some use zippers, others Velcro or elastic.
- Make sure nothing blocks seat controls or airbags.
6. Smooth And Adjust
Sit on the seat and lean back gently. This helps the cover settle. Smooth out any remaining wrinkles and pull the cover tight. Adjust straps and tucks as needed.
Beginner mistake: Many people forget to tighten all straps fully. Loose covers slide and wear out faster.
Special Tips For Different Seat Types
Not all seats are the same. Here is how to handle special cases.
Bucket Seats
These seats have deep sides:
- Pull the cover tightly around the bolsters.
- Use extra care with tucking to avoid loose fabric.
Split-folding Seats
If your rear seats fold down:
- Cover each section separately.
- Some covers zip together; line up zippers before attaching.
Seats With Side Airbags
- Only use covers marked as “airbag safe.”
- Do not block airbag openings.
- If in doubt, ask your car dealer for advice.
Heated Or Cooled Seats
- Make sure the cover material allows heat or air to pass.
- Never use thick, non-breathable covers—they can damage the seat function.
How To Make The Cover Stay In Place
A common problem is covers sliding, bunching, or coming loose. Here’s how to prevent that:
- Tighten all straps under and behind the seat.
- Check hooks are secure and not just hanging loose.
- Use anti-slip mats under the seat cover if it still moves.
- Recheck weekly for the first month. Covers loosen as you use them.
Pro tip: Seat covers with rubber dots or textured backing stay in place better than plain fabric.
Cleaning And Maintenance
To keep your seat covers looking good:
- Vacuum weekly to remove crumbs and dust.
- Spot clean stains right away with mild soap and water.
- Machine wash only if the label says it’s safe. Air dry—never use high heat, which can shrink covers.
- Check straps and hooks every few months for wear.
Troubleshooting Common Problems
Even with care, problems can happen. Here’s how to fix them:
| Problem | Cause | Solution |
|---|---|---|
| Cover bunches up | Straps too loose | Tighten straps, smooth fabric |
| Headrest holes do not match | Cover not centered | Reposition cover, check orientation |
| Hooks keep coming off | Wrong hook position | Move hooks to thicker part under seat |
| Fabric rips or tears | Cover pulled too hard | Go slowly, avoid sharp tools |
| Seat cover blocks controls | Incorrect model cover | Get a custom-fit cover |
Non-obvious insight: If your cover keeps sliding, check if the seat’s surface is too slippery. A thin shelf liner under the cover can help.
Credit: everestkitchennc.com
Comparing Universal Vs. Custom-fit Covers
Which type is easier to put back on? Here’s a quick side-by-side look:
| Feature | Universal Cover | Custom-Fit Cover |
|---|---|---|
| Fit | Loose, fits many cars | Tight, fits one car model |
| Ease of installation | Quick, but may need adjusting | Takes longer, but less adjusting |
| Stays in place | May move or bunch up | Usually stays tight |
| Looks | May have wrinkles | Professional appearance |
| Price | Cheaper | More expensive |
When Should You Replace Instead Of Reinstall?
Sometimes, a cover is too damaged to put back on. Replace your seat cover if:
- The fabric is ripped or worn out.
- Straps or hooks are broken.
- The cover no longer fits after washing.
- You see mold, mildew, or permanent stains.
Buying a new cover is often safer and more comfortable than struggling with an old one.
Credit: www.youtube.com
How To Save Time On Future Installs
After you finish, make next time easier:
- Take photos during each step. This is useful if you remove the cover for washing in the future.
- Label straps or hooks with colored tape.
- Keep instructions in your glovebox.
Tip: If you often remove covers (kids, pets, etc.), choose simple slip-on designs or waterproof seat protectors.
Safety Reminders
- Always check that seat belts and airbags are not blocked.
- Do not cut large holes unless the instructions say so.
- After installing, test all seat controls and safety features before driving.
For more tips and professional advice, you can read this detailed guide about car seats.
Frequently Asked Questions
How Long Does It Take To Put A Car Seat Cover Back On?
For most people, it takes about 20–40 minutes to put a cover back on one seat, depending on the type of cover and your experience. Custom-fit covers usually take longer than universal ones.
Can I Wash My Car Seat Cover In The Washing Machine?
Yes, but check the label first. Some covers are machine washable, while others may shrink or get damaged. Always air dry to avoid shrinking.
What If My Seat Cover Keeps Sliding Off?
Try tightening the straps or hooks. You can also place a non-slip mat or shelf liner under the cover. If it still slides, consider a custom-fit cover for better grip.
Is It Safe To Use A Seat Cover With Side Airbags?
Only use covers marked “airbag safe. ” These have special seams that let airbags deploy. Never block airbag openings.
Why Are There Wrinkles In My Seat Cover After Installation?
Wrinkles can happen if the cover is not tight or if the fabric was folded for a long time. Smooth out by hand, tighten all straps, and let the cover settle for a few days. Sitting on the seat also helps the fabric relax.
Getting your car seat cover back on does not have to be a headache. With careful steps and a little patience, you can protect your seats, improve comfort, and keep your car looking sharp. Remember, a well-fitted cover is not just about looks—it also keeps your car seats safe and lasting longer.