How to Put Cover on Car Seat: Easy Steps for a Perfect Fit
Putting a cover on your car seat may seem like a small task, but it can protect your car’s interior, keep your seats clean, and even make your drive more comfortable. Many car owners struggle with loose covers, awkward straps, or covers that just do not fit right.
If you’ve ever ended up with wrinkled or sliding seat covers, you know it can be frustrating. With the right steps and some simple tips, you can install seat covers smoothly and make them last longer. This guide will show you everything you need to know, whether you’re using universal covers or custom-fit ones.
You’ll learn how to choose the right material, prepare your car, fit the covers neatly, and keep them in place for daily use.
Why Use Car Seat Covers?
Car seat covers are not just for looks. They offer real value for any car owner. First, they protect your seats from stains, spills, and wear. This is especially important if you have kids, pets, or often eat in your car.
Second, covers can help keep your car cool in summer and warm in winter, depending on the material. Finally, good covers can raise the resale value of your car, as clean, undamaged seats are more attractive to buyers.
Many people also use covers to hide existing damage or to refresh the look of an older car. Some covers are even designed to support your back or make long drives more comfortable. You might be surprised how much difference the right cover can make in everyday driving.
Types Of Car Seat Covers
Choosing the right seat cover is the first step. There are several types, each with its own benefits and drawbacks. Here is a simple comparison:
| Type | Main Material | Best For | Drawbacks |
|---|---|---|---|
| Universal Fit | Polyester, nylon | Budget, easy swap | May not fit perfectly |
| Custom Fit | Leather, neoprene | Exact fit, style | More expensive |
| Semi-Custom | Mixed fabrics | Better fit, affordable | Some adjustments needed |
Universal covers are cheaper and easy to replace, but they often wrinkle or slide. Custom-fit covers cost more but match your seat shape closely, with neat seams and no extra fabric. Semi-custom covers are a middle ground—they fit better than universal ones but may need small adjustments.
Credit: www.cover-company.com
Choosing The Right Cover For Your Car
Before buying, measure your seats and check your car’s manual for any special seat features (like side airbags or split seats). Here are some things to consider:
- Material: Leather looks good but can get hot. Neoprene is water-resistant, great for active users. Cotton is soft but may stain easily.
- Fit: Custom covers are best for a snug look. Universal covers suit most cars but may need extra tucking.
- Color and Design: Light colors reflect heat, while dark colors hide stains better.
- Special Features: Some covers have pockets, lumbar support, or are made for heated seats.
A common mistake is buying covers without checking the seat’s headrest shape, armrests, or airbag locations. Make sure your chosen cover allows all safety features to work.
Tools And Supplies Needed
Before you start, gather these items:
- New seat covers (correct size and type)
- Scissors (for trimming straps if needed)
- A flat tool or butter knife (to tuck fabric)
- Small pliers (if removing stubborn hooks)
- Cleaning supplies (vacuum, cloth)
- Zip ties (optional, for extra hold)
Having everything ready will save time and help you avoid mistakes.
Preparing Your Car Seats
A smooth installation starts with clean seats. Dirt or crumbs under a cover can scratch your upholstery or create bumps. Follow these steps:
- Remove old covers: If you have any.
- Vacuum the seats: Get rid of dust, sand, and hair.
- Wipe with a damp cloth: Remove stains and let the seats dry.
- Check for damage: Make sure there are no sharp objects or tears.
If you have removable headrests, take them off now. Some covers require you to thread fabric around the headrest posts.
Step-by-step Guide: How To Put Cover On Car Seat
Now, let’s go through the installation process.
1. Identify The Right Cover For Each Seat
Most cover sets include separate pieces for the front and back, with labels like “driver,” “passenger,” or “rear. ” Lay them out and match them to your seats.
2. Slip The Cover Over The Top
Start with the upper part of the seat (the backrest). Pull the cover down over the headrest posts and adjust so the seams line up with the seat edges.
- For bucket seats: Make sure the cover fits tightly around the back and sides.
- For bench seats: Align the cover with the seat contours.
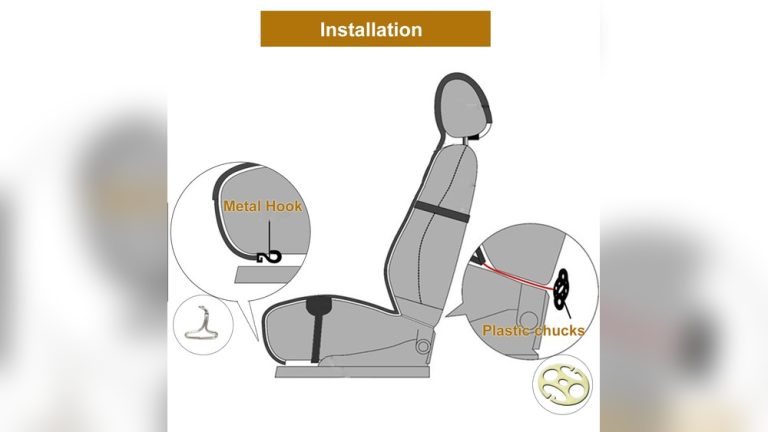
3. Secure Straps And Hooks
Most covers use elastic straps, hooks, or Velcro. Push the straps through the gap between the seat back and bottom. If the gap is tight, use a flat tool or your fingers.
- Attach hooks to the springs or frame under the seat.
- Pull straps tight, but not so much that they tear.
Some covers use zippers or ties along the sides. Follow the instructions for your cover type.
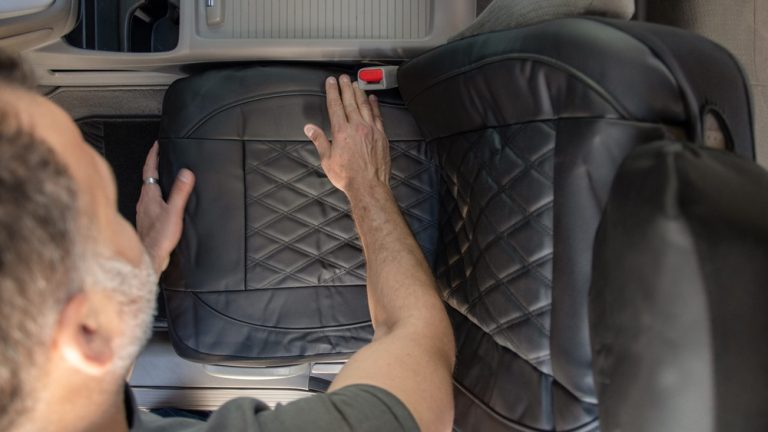
4. Smooth Out Wrinkles
Tug the cover fabric gently to remove wrinkles. Tuck extra material into the creases between the seat back and bottom. Use a butter knife or plastic tool for a neat finish.
5. Replace Headrests And Cut Holes If Needed
If your covers do not have pre-made holes for headrest posts, feel for the posts and make small cuts with scissors. Do not cut too much—just enough for the posts to fit through.
- Slide the headrest covers on.
- Put the headrests back into the seat.
6. Install Bottom Seat Covers
For the seat bottom, pull the cover over the front edge and stretch it back. Push the straps or flaps through the seat gap and attach them under the seat. Make sure the fabric is tight and smooth.
7. Adjust For Seatbelts And Armrests
Some cars have built-in seatbelts or center armrests. If your cover blocks these, unzip or untie the side seams. Never cover up any safety feature.
- For split seats: Some covers have zippers to allow part of the seat to fold down.
8. Repeat For Rear Seats
Rear seats are often trickier. Fold down the seat if possible, and follow the same steps. Make sure to allow for seatbelt access and child seat anchors.
9. Check Everything
Sit on the seat and adjust the cover as needed. Make sure the cover does not interfere with seat controls, airbags, or seatbelt latches.
10. Final Touches
Tidy up any loose straps or fabric. Use zip ties for extra hold if the straps seem loose. Step back and check that the cover looks even and neat.
Common Mistakes And How To Avoid Them
Many people run into problems that are easy to avoid:
- Not checking fit before installing: Always test-fit the cover before securing all straps.
- Ignoring safety features: Never block airbags or seatbelt latches.
- Skipping cleaning: Dirt trapped under a cover can scratch or stain the seat.
- Pulling straps too hard: This can tear the cover or damage the seat.
- Not securing hooks: Loose hooks can slip and make the cover bunch up.
Taking a few extra minutes can save you trouble later.
Tips For A Professional Finish
Here are some extra pointers for a neat, long-lasting fit:
- Warm the covers: If they are wrinkled from packaging, leave them in the sun for a while before fitting. This makes the fabric more flexible.
- Double-check alignment: Make sure seams line up with seat edges for a factory look.
- Use non-slip mats: For leather seats, a non-slip mat under the cover keeps it in place.
- Tighten straps evenly: Pull straps from both sides at once for a smooth fit.
- Cut holes carefully: Only cut fabric when you are sure of the location, and make small snips first.

Credit: www.familyhandyman.com
Maintaining Your Car Seat Covers
After installation, keep your covers clean and in good shape:
- Vacuum weekly to remove dust and crumbs.
- Spot clean stains right away with mild soap and water.
- Remove and wash fabric covers every few months (follow label instructions).
- Check straps and hooks for wear and tighten if needed.
Regular care will help your covers last longer and keep your car looking fresh.
Car Seat Cover Materials: A Detailed Comparison
Different materials have different strengths. Here’s a closer look:
| Material | Comfort | Durability | Water Resistance | Maintenance |
|---|---|---|---|---|
| Neoprene | High | Very good | Excellent | Easy |
| Leather | Medium | Excellent | Good | Needs care |
| Fabric | Soft | Good | Poor | Washable |
| PU Leather | Medium | Good | Good | Wipe clean |
Neoprene is popular for families and outdoor lovers. Real leather looks high-end but needs regular conditioning. Fabric is cozy but stains easily. PU leather is a budget-friendly leather lookalike and easy to clean.
When To Replace Or Remove Seat Covers
Even the best covers wear out. Replace them when you see:
- Fading or cracking
- Torn seams or worn-out straps
- Unpleasant smells that don’t go away with cleaning
- Poor fit after washing
Remove covers before selling your car to show the protected, clean seats underneath. Some car inspections also require removing covers to check for safety.
Non-obvious Tips For Beginners
- Install covers in a warm place: Cold weather makes fabric stiff and harder to stretch. A warm garage or sunny day works best.
- Check for hidden seat controls: Some cars have levers or buttons on the side or under the seat. Make sure your cover does not block these.
- Label your covers: If you have a set for front and rear, use a sticky note or marker to label each piece before starting. This avoids confusion during installation.
Many beginners overlook these simple tricks, which can save time and prevent frustration.
Frequently Asked Questions
How Long Does It Take To Put A Cover On A Car Seat?
For most cars, installing a single seat cover takes about 15 to 30 minutes. If you are doing all seats, plan for about 1 to 2 hours. The first time is usually slower, but it gets easier with practice.
Can I Use Universal Seat Covers On Any Car?
Universal covers fit most standard seats but may not work well with special shapes, integrated headrests, or sport seats. For best results, check your car model and compare measurements before buying.
Are Car Seat Covers Safe With Side Airbags?
Many modern covers are designed with airbag compatibility in mind. Always choose covers labeled “side airbag compatible” and follow the installation guide closely. Never cover or block airbag openings.
How Do I Keep My Seat Cover From Slipping?
For fabric or leather seats, add a non-slip mat under the cover. Tighten all straps evenly, and check hooks are secure. Custom-fit covers are less likely to slip than universal types.
Where Can I Find More Detailed Guides Or Reviews?
You can find in-depth guides, reviews, and car-specific advice on sites like Consumer Reports.
Putting a cover on your car seat is a simple way to protect your investment and enjoy a cleaner, more comfortable ride. By choosing the right cover and following these steps, you can give your car a fresh look and make your daily drive more enjoyable.