How to Remove Evenflo Car Seat Cover Easily and Safely
Removing the cover from an Evenflo car seat can feel overwhelming, especially if you’ve never done it before. Maybe your child spilled juice, or the cover just needs a good wash after months of use. Whatever the reason, taking off the cover the right way is important—not just for cleaning, but also for safety when you put it back on.
Many parents worry about damaging the seat or forgetting how to reassemble it. The good news? With careful steps and the right guidance, you can remove your Evenflo car seat cover easily and confidently.
This guide will walk you through every step, from understanding your specific Evenflo model to practical tips for washing and reattaching the cover. You’ll also find non-obvious advice, common mistakes to avoid, and helpful answers to the most frequent questions.
Whether you’re a new parent or simply want to keep your child’s car seat fresh, you’ll find everything you need right here.
Understanding Your Evenflo Car Seat Model
Before you start, it’s essential to know which Evenflo car seat model you have. Evenflo produces various types, including convertible, infant, and booster seats. Each model may have a slightly different cover removal process. You can usually find the model name and number on a sticker at the bottom or back of your car seat.
Some popular models include:
- Evenflo Symphony
- Evenflo Tribute
- Evenflo Sonus
- Evenflo Maestro
- Evenflo EveryFit
Why does model matter? The cover’s attachment points, the way the harness threads through, and the overall design can differ. Using the wrong method can damage the seat or make reassembly difficult. If you still have your manual, keep it close—it contains model-specific diagrams and instructions. If you lost it, you can often download a PDF from the Evenflo official site.
Key Differences By Model
| Model Name | Cover Attachment Style | Unique Features |
|---|---|---|
| Symphony | Elastic bands, hooks | All-in-one, heavier padding |
| Tribute | Snaps, minimal elastic | Compact, lightweight |
| Sonus | Elastic, few snaps | Ventilated seating |
| Maestro | Velcro, snaps | Booster transition |
| EveryFit | Elastic, hooks, zippers | Multiple recline positions |
Knowing your model helps prevent frustration and reduces the risk of breaking an attachment point.
Preparing For Cover Removal
Getting ready makes the process smoother and faster. Here’s what you need:
- A clean, flat workspace—a table or floor area with good lighting.
- Evenflo car seat manual—paper or digital.
- Smartphone or camera—for taking pictures during disassembly.
- A small container—to hold clips, screws, or small parts.
- Mild soap and gentle detergent—for cleaning the cover later.
- A lint roller or handheld vacuum—to clean crumbs before washing.
Take a few clear photos of your car seat before removing anything. Snap pictures as you go, especially of how the harness and straps are threaded. These images are extremely helpful during reassembly. Many parents skip this step and struggle to remember the correct setup.
Step-by-step Guide To Removing The Evenflo Car Seat Cover
The process may vary slightly, but these steps cover most Evenflo seats.
1. Remove The Car Seat From The Vehicle
Take the car seat out of your car and set it on your workspace. Removing the cover inside the car is difficult and messy.
2. Unbuckle And Loosen All Straps
Unclip the harness buckle and chest clip. Loosen the harness straps completely. This gives you more room to work and prevents tangling.
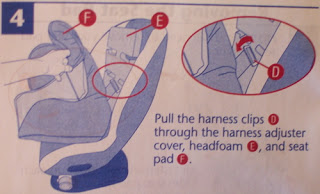
3. Remove The Harness Straps (if Needed)
Some Evenflo models require you to remove the harness straps to fully take off the cover. Carefully unhook the straps from the splitter plate at the back of the seat. This metal plate holds the harness ends in place.
Pro tip: Take a close-up photo of how the straps attach to the splitter plate. Many parents forget this step and re-thread the harness incorrectly later.
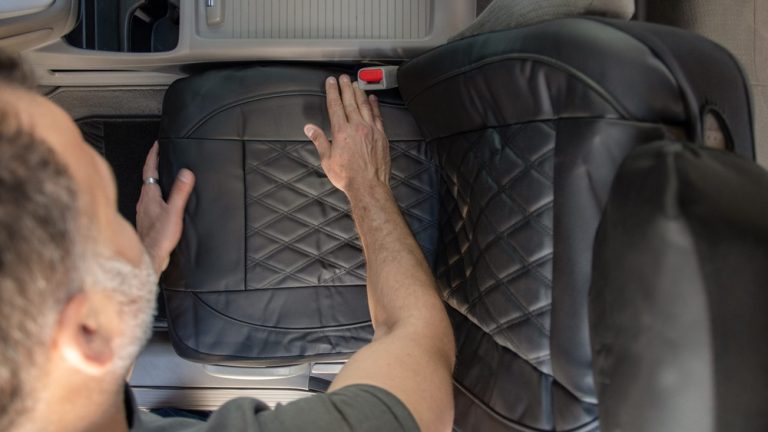
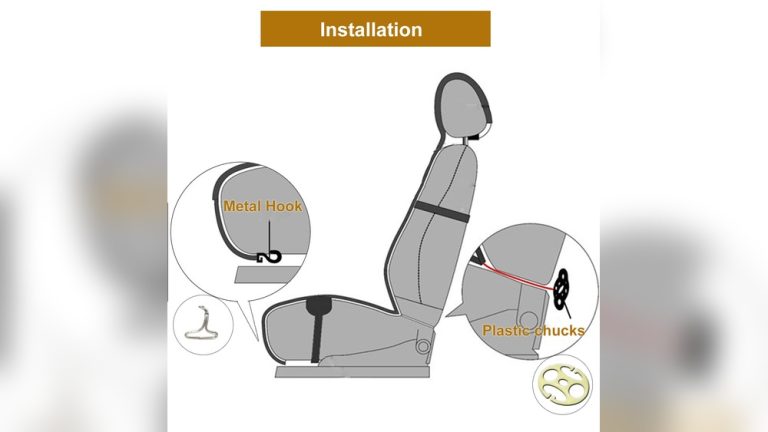
4. Detach The Cover Attachments
Look for the attachment points:
- Elastic bands: Gently stretch and pull them off hooks or around the seat edge.
- Snaps or buttons: Unsnap carefully to avoid breaking.
- Velcro: Separate slowly, so you don’t tear the fabric.
- Hooks or loops: Unhook with care, and remember their position.
Some models have a combination of these methods. Do not force anything—if a part feels stuck, check for hidden snaps or hooks.
5. Remove The Headrest And Padding Inserts
If your seat has a removable headrest or extra padding, take these out first. Usually, they are attached with Velcro or simply rest in place.
6. Slide The Cover Off
Once all attachments are undone, gently pull the cover off the seat frame. For convertible models, you may need to wiggle it around the harness slots. Work slowly to avoid stretching or tearing the fabric.
Common Mistakes To Avoid
- Forgetting to take pictures during each step.
- Forcing elastic or hooks, which can break them.
- Losing small parts like snaps or clips.
- Not removing all straps or inserts before pulling the cover.
Cleaning And Caring For Your Evenflo Car Seat Cover
Now that the cover is off, proper cleaning is crucial. Evenflo covers are usually machine-washable, but check the care label on your specific cover.
Washing Instructions
- Shake out crumbs and debris before washing.
- Pretreat stains with a mild soap or gentle stain remover.
- Machine wash on cold, gentle cycle. Use a mild detergent—never bleach.
- Air dry only. Do not put the cover in the dryer, as high heat can shrink or damage it.
Cleaning Straps And Buckles
Never put harness straps or buckles in the washing machine or submerge them in water. Use a damp cloth and mild soap to wipe them clean. Submerging straps can weaken them and reduce safety.
Drying Time Comparison
Here’s a quick look at how long different Evenflo covers usually take to dry after washing:
| Model | Drying Time (Air Dry) | Dryer Safe? |
|---|---|---|
| Symphony | 6-8 hours | No |
| Tribute | 4-6 hours | No |
| Sonus | 6-8 hours | No |
| Maestro | 4-6 hours | No |
| EveryFit | 8-12 hours | No |
If you need the cover to dry faster, hang it near a fan or in a well-ventilated area.
How To Reinstall The Evenflo Car Seat Cover
Putting the cover back on is often harder than removing it. Here’s how to make reassembly easier.
1. Check That The Cover Is Completely Dry
Never reinstall a damp cover. Moisture can lead to mold or mildew growth inside the seat.
2. Start With The Headrest And Padding
If your seat has removable inserts or headrest pads, put these back first.
3. Slide The Cover Over The Seat Frame
Align the cover with the harness slots and seat edges. Pull it gently into position without stretching.
4. Reattach All Fasteners
Work in reverse order:
- Hook elastic bands back around the seat frame.
- Snap buttons or secure Velcro as you go.
- Rehook any loops or hooks to their original spots.
Non-obvious tip: Some elastic bands may feel tighter after washing. Work slowly to avoid snapping them.
5. Re-thread The Harness Straps
Use your photos from earlier as a reference. Double-check the harness path—it must match the original configuration for safety.
6. Tighten And Test
Buckle all straps, tighten the harness, and make sure everything sits flat and snug. The cover should not bunch or block any harness slots.
Common Issues When Reinstalling
- Forgetting to thread straps through all cover slots.
- Cover sitting crooked or loose because of missed attachment points.
- Harness twisting under the cover.
If you’re unsure, watch a model-specific video on the Evenflo website or contact their customer support.
Safety Checks After Reassembly
Your child’s safety depends on correct reassembly. Always check:
- All harnesses and buckles operate smoothly.
- The cover does not block harness slots or adjustment buttons.
- No part of the cover is bunched, twisted, or blocking the belt path.
- The seat passes the “pinch test”—you cannot pinch the harness strap at the child’s shoulder when tightened.
Never use the seat if you are unsure about any part of the reassembly.

Credit: www.youtube.com
Practical Tips For Keeping Your Car Seat Clean Longer
- Use a seat protector mat under the car seat to catch crumbs and spills.
- Keep a small towel over the seat during snack times for easy cleanup.
- Clean up spills immediately with baby wipes or a damp cloth.
- Wash the cover every few months, even if it looks clean—dirt and sweat can build up.
- Store the manual and a few reassembly photos in your glovebox for next time.
What Beginners Often Miss
- Not all Evenflo covers are created equal. Some have hidden zippers or extra snaps only found by feeling under the cover.
- Harness re-threading is the most common point of confusion. Missing one slot or threading incorrectly can make the seat unsafe. Always check your manual or reference photos.
- Air drying is mandatory. Even a quick tumble in the dryer can shrink the cover, making it impossible to reinstall.
Credit: www.swistle.com
When To Replace Instead Of Clean
If the cover is ripped, heavily stained, or the padding is coming apart, it’s safer to order a replacement cover from Evenflo. Never use a cover from another brand or a homemade substitute—this can affect crash performance and void your warranty.
Frequently Asked Questions
How Often Should I Wash The Evenflo Car Seat Cover?
It’s best to wash the cover every 2–3 months, or immediately after a major spill. Regular washing prevents odors, mold, and buildup of dirt. If your child gets carsick or has allergies, more frequent cleaning may be necessary.
Can I Put The Evenflo Car Seat Cover In The Dryer?
No, you should always air dry Evenflo car seat covers. Using a dryer can cause shrinkage or damage to the fabric and elastic, making it difficult to reinstall the cover properly.
What If I Lose A Snap Or Elastic Band During Removal?
Contact Evenflo customer service for replacement parts. Do not use household items like safety pins, as they can be unsafe in a crash. Always use genuine Evenflo parts to maintain seat safety.
Are All Evenflo Car Seat Covers Machine-washable?
Most are, but always check the care label attached to your cover. Some specialty fabrics or models may require hand washing or specific detergents. If in doubt, consult the Evenflo manual or website for guidance.
How Do I Know If I Reinstalled The Cover Correctly?
Double-check that all straps, harnesses, and buckles are working properly. The cover should sit flat, with all slots lined up. Use your reference photos and the manual. If something doesn’t look right, remove and try again—never compromise on safety.
Removing, cleaning, and reinstalling your Evenflo car seat cover takes some patience and attention to detail, but it’s absolutely doable for any parent or caregiver. With the right preparation and careful steps, you’ll keep your child’s seat clean, safe, and looking like new—ready for every adventure ahead.